stuxlogo

Step by step user guide for STUX GNU/Linux (index)

Network services

You can use STUX to provide a variety of network services:

  1. Apache Web server
  2. ProFTP FTP server
  3. PXE Boot server
  4. MySQL
  5. Samba
  6. SSHd
  7. Syslog
  8. Ample (MP3 lender)
  9. ...

STUX Service Manager aggregates the most common network services functions:

  1. configure
  2. start
  3. stop
  4. restart
  5. start / dont't start at boot

  1. STUX Service Manager

    To start STUX Service Manager:
    STUX CONTROL CENTER -> Network -> Services
    A window like this will appear:


    You can see in table the current status of services and, for each service, if it must be monitored by Always On daemon.

    To manage a service, right-click on the service: a popup menu will appear:

    • Start
        Start selected service.

    • Stop
        Stop selected service.

    • Restart
        Restart selected service.

    • Activate/Disactivate Always On
    • Configure
        Configure selected services.

    1. MySQL

        MySQL is a popular DB engine.

        Setup

        1. To run MySQL server, open the STUX Service Manager, right-click on 'MySQL' service and choose 'Configure' from menu.

          A window like this will appear:


        2. MySQL directory is the directory where MySQL saves database files, so it has to be large enough and persistent; in STUX Live, default MySQL directory /var/lib/mysql is located in volatile RAM, it's not persistent and usually is not large enough to store MySQL data. So we have to change it. You can keep /var/lib/mysql for demo/testing purposes.

          Press button labeled 'Change' and choose a new directory on a real hard disk (example: /mnt/hda2/mysql).

        3. Create MySQL main database, if not already done, pressing button labeled 'Create database'.
          When main database is done, button labeled 'Create database' is re-labeled in 'Drop main database' that can be used to re-initialize MySQL, and is now possible to insert the root MySQL username and password, as shown in picture:


        4. It's recomended to set a password for MySQL root user, even if not mandatory.

          If you installed phpMyAdmin (using default settings), the checkbox 'Update phpMyAdmin password' is enabled. If checked, password will be setted also for web application phpMyAdmin.

        5. When done, close the window and go back to STUX Service Manager.

        Start service:

          When main database is created, to run MySQL server, open the STUX Service Manager, right-click on 'MYSQL' service and choose 'Start' from menu.

    2. Apache Web server

        To run Apache Web server, open the STUX Service Manager, right-click on 'HTTP' service and choose 'Start' from menu.

        Test if service is working accessing url http://127.0.0.1: you will see a site like this:


        To configure HTTP service, right-click on 'HTTP' service and choose 'Configure': you will see a window like this:


        This window mainly reports that:

        • server is currently serving pages located locally in /var/www/htdocs/

        • server is currently logging in /var/log/apache/

        • S.S.L. (Secure Socket Layer) is disabled

        Secure HTTP with S.S.L.

          To secure HTTP with S.S.L., you need certificates: certificates are files emitted by Certification Authorities that ensure some levels of privacy between web server and browsers.

          If you don't have a certificate emitted by a Certification Authority, you can generate a certificate by yourself.

          NOTE: creating a certificate auto-certifying its validity, does not compromise privacy; simply, nobody else than you certifies that you are who you are saying to be.
          Connection encryption is guaranteed even if you auto-generate a certificate.


          In the section 'S.S.L. support' (see picture above) there are 3 options:

          1. Enable S.S.L.

            1. Click this button to enable S.S.L..

              If there are no cartificate present, you will be prompted to inteactively create a new one.

              Create the cerificate following instructions.

              If certificate is present, S.S.L. is activated: the button that first was labeled 'Enable S.S.L.' is now labeled 'Disable S.S.L.'.

            2. HTTP service needs to be restarted in order S.S.L. to be used: close the HTTP Configuration window and, in the STUX Service Manager, right-click on 'HTTP' service and click 'Restart' (or 'Start' if was not running).

            3. test S.S.L. pointing your browser at https://127.0.0.1: some warning will appear if certificates have been produced by an unknown authority (by you, in this example): you need to purchase a real certificate to avoid this warning message: click ok to proceed: you will see a secure web site like this picture:


          2. Edit /etc/apache/mod_ssl.conf

              When using S.S.L., instructions in /etc/apache/mod_ssl.conf override some instructions in /etc/apache/httpd.conf:
              for example, for S.S.L. Document Root Directory is not defined in httpd.conf, but in mod_ssl.conf.
              Click this button to edit file /etc/apache/mod_ssl.conf

          3. Certificate

              Click this button to auto-generate S.S.L. certificate.

        Customize Apache web server

          In STUX Service Manager, right-click on 'HTTP' and choose 'Configure' from popup menu; click 'Edit /etc/apache/httpd.conf': this let you edit apache configuration file manually. This requires a base knowledge of apache software.

          • Document Root directory:

              As first thing you need to change Apache Document Root directory, that is the directory that contains the files of your web site: to configure apache for use your local web site (we suppose you keep it in in /mnt/hda1/www), search and replace ALL occurrences of /var/www/htdocs (or the current Apache Document Root directory) with the directory that contains your site (in our example /mnt/hda1/www). To do this, from the text editor menu, choose 'Edit' -> 'Replace', as you can see in the following picture:


              When configuration file is changed, HTTP service needs to be restarted for changes to take effect.

              Now you are serving your web page located, in the example, in directory /mnt/hda1/www.

              Note for S.S.L.: If you are using S.S.L., the Document Root directory is specified in /etc/apache/mod_ssl.conf and not in /etc/apache/httpd.conf, so you need to click on button labeled 'Edit /etc/apache/mod_ssl.conf' instead of button labeled 'Edit /etc/apache/httpd.conf'.

          • Log directory:

              You also want to change the directory where apache writes logs: to do this, replace ALL occurrences of /var/log/apache (or the current directory where apache currently saves logs) with the directory where you want to save log files, as done for customize the Apache Document Root directory.

              Note for S.S.L.: If you are using S.S.L., the Log directory is specified in /etc/apache/mod_ssl.conf and not in /etc/apache/httpd.conf, so you need to click on button labeled 'Edit /etc/apache/mod_ssl.conf' instead of button labeled 'Edit /etc/apache/httpd.conf'.

        Apache and PHP

          PHP is enableb by default in STUX Live.
          Simply put .php files in Document Root Directory and access them with web browser.
          See also Web applications.

    3. ProFTP FTP server

        To run ProFTP FTP server, open the STUX Service Manager, right-click on 'FTP' service and choose 'Start' from menu.

        Test if service is working: open Konqueror browser:
        STUX CONTROL CENTER -> Network -> Clients -> Browser -> Konqueror
        and insert this URL in the location bar:
        ftp://127.0.0.1
        NOTE: to login to FTP server you need a password because, by default, STUX doen't assign any password. To set password, see section Users and passwords.

        To configure FTP server: open STUX Service Manager, right-click on 'FTP' and choose 'Configure' from popup menu: a window like this will appear:


        This windows reports that:

        1. Anonymous access is currently disabled
        2. Anonymous base directory is /home/ftp (change this to a real directory is you enable anonymous access)
        3. Server is logging accesses in /var/log/proftpd.log
        4. Server is logging transfers in /var/log/xferlog

        Buttons:

        • Edit /etc/proftd.conf

          Click this button to manually edit ProFTP configuration file.
          Knowledge of ProFTP software is required to edit this file (full documentation on ProFTPD, including configuration and FAQs, is available at http://www.proftpd.org/)

          It' s recomended to change the log directory /var/log because in STUX Live, /var/log is located in volatile RAM and will be lost on reboot: to do this, click button 'Edit /etc/proftd.conf' and replace all occurrences of /var/log with the persistent directory you choosed, typically on hard disk (example: if you need to save FTP log files in /mnt/hda1/proftpdlog, replace all occurrences of /var/log with /mnt/hda1/proftpdlog).

        • Enable anonymous access

          See Anonymous FTP

      • Anonymous FTP

          Click button 'Enable anonymous access' to enable anonymous access: with anonymous access users can login to FTP server using 'anonymous' as username and no password.

          Useful to serve files when authentication is not required.

          By default, home directory for anonymous users is /home/ftp, but you can change this editing file /etc/proftd.conf, replacing all occurrences of ~ftp (or the current anonymous base directory) with the new directory.

      • FTP virtual users

          It is possible to create 'virtual' FTP users.
          Virtual FTP users are not system users, but only FTP users.

          To create FTP virtual user 'bob', with home directory in /mnt/hda2/ftpusers/bob:

          1. create directory for bob in, for example, /mnt/hda2/ftpusers/bob

          2. create password in an alternative password file located in, for example /root/ftpass.txt:
            ftpasswd --passwd --file=/root/ftpass.txt --name=bob --uid=1001 --home=/mnt/hda2/ftpusers/bob --shell=/bin/bash
          3. edit /etc/proftpd.conf and add this line:
            AuthUserFile /root/ftpass.txt
            if not already present, at the end of the file.

          4. if proftpd is already running, reload proftpd configuration: open STUX Service Manager, right-click on 'FTP', choose 'Restart' from popup menu (or 'Start' if was not running).

    4. Bluetooth services

        Bluetooth is an industrial specification for wireless personal area networks (PANs), also known as IEEE 802.15.1. Bluetooth provides a way to connect and exchange information between devices like personal digital assistants (PDAs), mobile phones, laptops, PCs, printers and digital cameras via a secure, globally unlicensed short range radio frequency (more on wikipedia).

        You can use STUX to interact with other Bluetooth devices.

        You need a Bluetooth dongle in order to use Bluetooth; a Bluetooth dongle is usually an USB key.
        Plug the Bluetooth dongle in an USB port to start.

        Before starting Bluetooth services, choose a P.I.N. (Personal Identification Number) in order to access computer from remote devices: right click on BLUETOOTH with mouse and choose 'Configure' from the popup menu. A window like this will appear:


        • Ask me P.I.N. when necessary:

          This option has been disabled.

        • Save P.I.N.:

          Here you can specify a static P.I.N..
          P.I.N. number will be saved and automatically used when necessary.

        Click Ok when done and press Close to close the Bluetooth configuration window.

        To start BLUETOOTH service, open the Services Manager, click with right mouse button on BLUETOOTH service and choose 'Start' from popup menu.

        You will see the KdeBluetooth icon in the KDE System Tray:


        Click on the Bluetooth icon to access remote Bluetooth services.
        More info abouth KdeBluetooth: http://docs.kde.org/development/en/extragear-pim/kdebluetooth/

        How to receive a file from a remote Bluetooth device, like a cellphone:

        1. choose the file in the cellphone
        2. choose 'Send via bluetooth' (or similar) on the phone
        3. select the device that identifies your computer (by default, STUX identifies itself as 'BlueZ').

          On computer monitor, a window like this will appear:


        4. Click 'accept' to start transfer. A window like this will appear:


        5. Click 'Save' to save file locally.


    5. Azureus (BitTorrent)

        Azureus is a popular BitTorrent program.
        BitTorrent is a Peer To Peer protocol for large file transfers (more on wikipedia).

        To start Azureus, open the Services Manager, click with right mouse button on AZUREUS service and choose 'Start' from popup menu.

        A window like this will appear:


        From within Azureus you can fully configure your torrent transfers.

        STUX has ALL current Azureus plugins installed: just activate them to use.

        Azureus user guide: http://azureus.sourceforge.net/doc/Azureus%20User%20Guide.htm.

        If you prefer the 'command line', the original bittorrent-4.4.0 is also installed.


    6. Dynamic Host Configuration Protocol Server (DHCP)

        DHCP allows hosts on a TCP/IP network to request and be assigned IP addresses, and also to discover information about the network to which they are attached. (more on wikipedia)

        To start DHCP service, open the Services Manager, click with right mouse button on DHCP service and choose 'Start' from popup menu.

        To configure DHCP, right click with mouse on DHCP service and choose 'Configure' from popup menu.

        A window like this will appear:


        Choose the network interface where the DHCP server should listen to.
        Click 'Start DHCP' (or 'Restart DHCP' if already running) to apply changes.


    7. PXE Boot server

        The Preboot Execution Environment (PXE, aka Pre-Execution Environment) is an environment to bootstrap computers using a network interface card independently of available data storage devices (like hard disks) or installed operating systems (more on wikipedia).

        Remote machines must support booting from network: if booting from network is not supported from BIOS you can create a boot floppy disk that boots from network.

        If remote machine BIOS does not support booting from network and does not have a floppy drive too, that machine cannot be booted from network.

        PXE Boot server is not properly a service itself, but is a collection of services.

        To configure PXE server: open the STUX Service Manager, right-click on 'PXE' service and choose 'Configure' from popup menu.
        This will bring you to an interactive menu that let you canfigure PXE server.

        To run PXE boot service, open the STUX Service Manager, right-click on 'PXE' service and choose 'Start' from popup menu.

        Test if service is working: start a remote machine, in the same LAN of STUX computer, configured to boot from network: STUX will be loaded on remote machine.


    8. VNC (Virtual Network Computing)

        Virtual Network Computing (VNC) is a desktop sharing system which uses the RFB (Remote FrameBuffer) protocol to remotely control another computer. It transmits the keyboard presses and mouse clicks from one computer to another relaying the screen updates back in the other direction, over a network. (more on wikipedia)

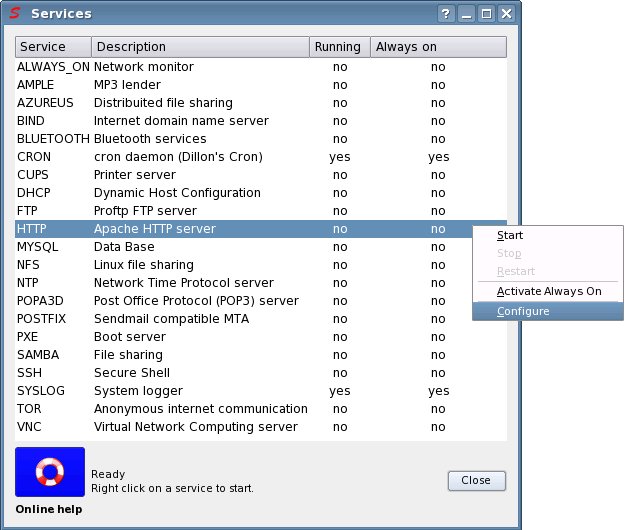
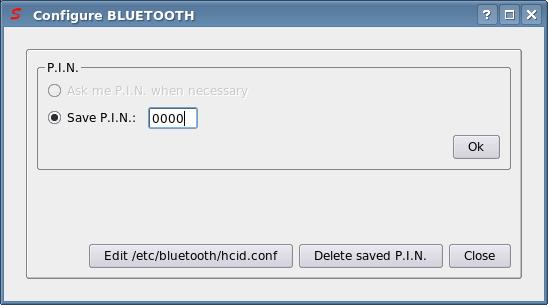
        To configure VNC service, open the STUX Service Manager, right-click on 'VNC' service and choose 'Configure' from menu. A window like this will appear:


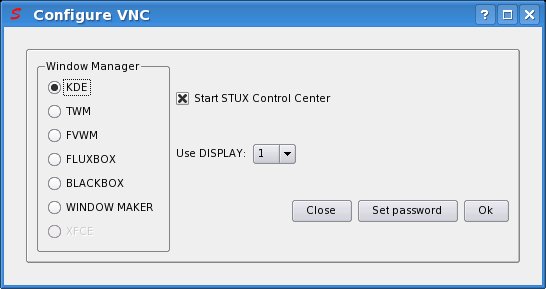
        Here you can choose the Window Manager to run on display 1 and choose if start STUX Control Center when session starts.
        To start VNC service, open the STUX Service Manager, right-click on 'VNC' service and choose 'Start' from popup menu.
        Using this graphical interface, you can run a virtual computer only on display 1.
        If you have never started VNC, you will be prompted for the password to be used to access the desktop.

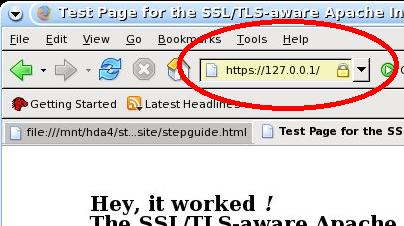
        You can test VNC service, executing a VNC compatible client:
        STUX Control Center -> Network -> Clients -> Desktop sharing -> KDE Remote Desktop client
        and specifying local address:
        127.0.0.1:1


    9. NFS (file sharing)

        Network File System (NFS) is a protocol originally developed by Sun Microsystems, as a distributed file system which allows a computer to access files over a network as easily as if they were on its local disks (more on wikipedia).

        To configure NFS service, open the STUX Service Manager, right-click on 'NFS' service and choose 'Configure' from menu. A window like this will appear:


        In the picture, directory /mnt/ is shared.
        To share a new directory, click button 'Share a new directory'; a window like this will appear:


        Choose the directory to share, eventally change options, and click 'Ok' to start sharing selected directory.

        For a full explanation of sharing options, execute command:
        man exports
        from console.

        To run NFS service, open the STUX Service Manager, right-click on 'NFS' service and choose 'Start' from popup menu.

        To test service, open STUX Storage Device Manager, choose the 'Network disks' tab, right click in the list-view and select 'New NFS share' from popup menu, you will see a window like this:


        This will mount the NFS share 192.168.2.253:/mnt under directory /mnt/nfs.

    10. Samba

        Samba is an Open Source/Free Software suite that provides seamless file and print services to SMB/CIFS clients (more on wikipedia).

        To configure Samba, open the STUX Service Manager, right-click on 'SAMBA' service and choose 'Configure' from menu. A window like this will appear:


        • Users
          Click 'Users' button to create users for Samba.


        • Configure shares
          Click 'Configure shares' button to create/edit shares.


        • Edit /etc/samba/smb.conf

          Click this button to manually edit samba configuration file.


        To run Samba service, open the STUX Service Manager, right-click on 'SAMBA' service and choose 'Start' from menu.

        To test service, open STUX Storage Device Manager, choose the 'Network disks' tab, right click in the list-view and select 'New Samba share' from popup menu, you will see a window like this:


        This will mount the Samba share //192.168.2.253/mnt under directory /mnt/smb.

        Note for expert users (file /etc/samba/smb.conf):

          Configuration for Samba server (shares, permissions, etc.) are stored in file
          /etc/samba/smb.conf
          To edit Samba configuration file /etc/samba/smb.conf, open the STUX Service Manager, right-click on 'SAMBA' service, choose 'Configure' from popup menu and press button labeled 'Edit /etc/samba/smb.conf'.
          Base knowledge of Samba configuration is required to edit this file (see also: man samba).

          As example, we'll share directory /usr/doc to everyone: just add this lines at the end of Samba configuration file:
          [docs]
          path = /usr/doc
          public = yes
          only guest = yes
          writable = yes
          printable = no
          
          When configuration file is changed, Samba server needs to be restarted: open the STUX Service Manager, right-click on 'SAMBA' service, choose 'Restart' from popup menu.


    11. SSH

        Secure Shell or SSH is a set of standards and an associated network protocol that allows establishing a secure channel between a local and a remote computer (more on wikipedia).

        To run SSH shell service, open the STUX Service Manager, right-click on 'SSH' service and choose 'Start' from menu.

    12. Syslog

        To run Syslog service, open the STUX Service Manager, right-click on 'SYSLOG' service and choose 'Start' from menu.

    13. Ample (MP3 lender)

        Web site: http://ample.sf.net

        You first need to specify an existing directory containing at least 1 mp3 file to be streamed over network (default port is 1234) or service will not start: to configure Ample service, open the STUX Service Manager, right-click on 'AMPLE' service and choose 'Configure' from menu. Choose to edit /etc/ample.conf and set variable 'mp3path' to you directory containing mp3 files. Example:
        mp3path = /root/mp3

        To run Ample service, open the STUX Service Manager, right-click on 'AMPLE' service and choose 'Start' from menu.


    14. Tor (anonymous Internet)

        Tor (The Onion Router) is a free software implementation of second-generation onion routing, a system enabling its users to communicate anonymously on the Internet (more on Wikipedia).
        Web site: http://tor.eff.org

        To run TOR service, open the STUX Service Manager, right-click on 'TOR' service and choose 'Start' from menu.

        Now you can use the TorButton Firefox extension.


There is a public forum about this.


stuxlogo